
The time has come to kick off the spring cleaning. And that also applies to your two-wheeler whether you’ve been riding it all winter or it has been sitting idle in the garage for the past few months. Different scenarios call for different approaches. In this blog I’ll explain exactly what you should, and more importantly, what you shouldn’t do when detailing your bike.
How often should I clean my motorcycle?
How often your bike needs a wash really depends on you as a rider. Put simply, there are two types:
- The all-season rider, who adjusts their gear to the weather and rides year-round.
- The fair-weather rider, who only hops on the bike to enjoy sunny days.
Cleaning the motorcycle as an all-season rider
The rider hardened by rain, wind, and cold doesn’t back down even in winter. He throws on his gear without complaint and braves the elements. But it’s not just the rider who suffers, the bike takes a beating too. Road salt, endless kinds of mud, sand, and grime are everywhere in the off-season. Even if you’ve chosen a bike that can handle tough conditions, or you’re riding an older machine, it’s still wise not to be too casual about cleaning and maintenance.
It takes little effort to swing by the car wash, drop €0.50 into the high-pressure hose, and give the bike a rinse. A quick spray every two weeks won’t hurt, just keep an eye on your chain lubrication. Carrying a small can of chain spray is highly recommended. Of course, spraying down the bike is only a temporary fix. A proper deep clean is unavoidable if you want your motorcycle to last. Check the 5 steps below for the full process.
Cleaning the motorcycle as a fair-weather rider
For the fair-weather rider, things look a little different. Salt and snow aren’t part of their vocabulary, and a fortnightly rinse isn’t something they bother with. Still, it’s important for them too to clean their bike regularly, if not for the bike’s health, then at least so it looks spotless and boosts the rider’s pride. Often, a quick wipe of the dirtiest spots will do, but a thorough clean from time to time is necessary. So how exactly do you do it right?
How to clean your motorcycle thoroughly
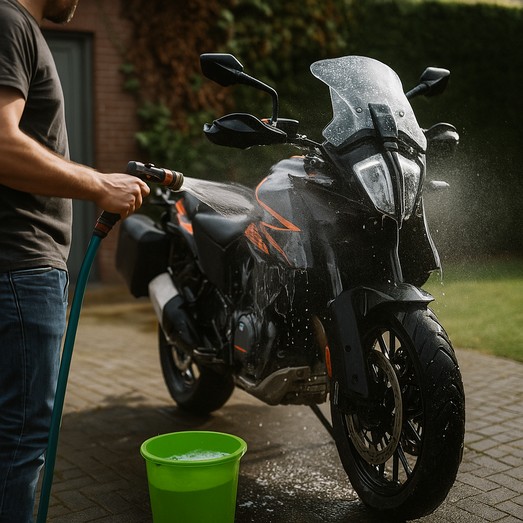
Step 1: Rinse and wash with a mild soap
Start with water and a mild (pre-wash) soap, ideally with a garden hose or bucket and microfiber hand mitt. Using the car wash high-pressure hose is also an option but leave the Kärcher power washer at home. Start rinsing from top to bottom. Motorcycles are built to withstand rain, not a jet stream from below. That’s just a recommendation but if you feel like filling your exhaust with water, we won’t stop you.
Step 2: Clean with a stronger motorcycle cleaner and chain degreaser
Next, use a stronger cleaner like a motorcycle-specific spray for the bodywork. This is also the time to spray your brake discs and degrease your chain. When cleaning the chain, use a proper chain brush and a paddock stand (or a strong friend to lift the bike). No stand? Just roll the bike back and forth a few times. After letting the products sit for a few minutes, rinse everything off thoroughly.
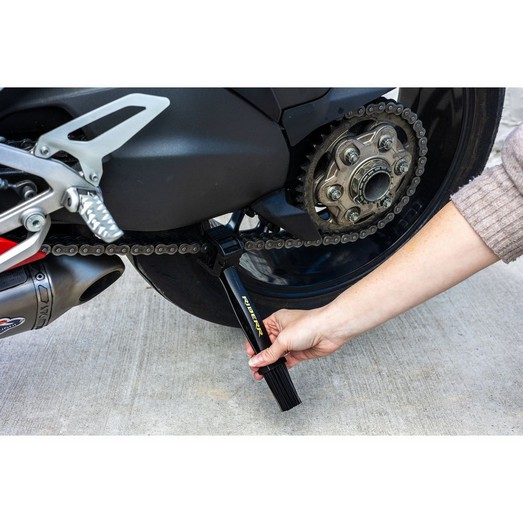
Step 3: Dry the bike and lubricate the chain
At this point, your bike is clean but wet. Speed up the drying process by wiping it with a soft cloth, using a blower, or simply taking a short ride. Avoid leaving the bike in direct sunlight because the droplets dry instantly and leave behind cheap-looking water spots. Once dry, lube the chain. There are plenty of chain sprays to choose from, pick your favorite and don’t be stingy.
Step 4: Clean the exhaust and dirty spots
Now comes the fun part: detailing. Grab one or two microfiber cloths you don’t mind sacrificing and a degreaser. Wheels, especially the rear rim, and all components around the chain will be caked in greasy grime. Washing alone won’t do the trick here. Start with the cleaner areas and work your way to the dirtiest spots. Products like Vulcanet wipes work wonders too.
For the exhaust, a steam cleaner is safe and effective, it loosens dirt without letting water inside. After removing the worst grime, polish the metal with a cleaner, and finish with a metal polish to restore that shine. The same goes for brake calipers, reservoirs, and the engine block use a mild degreaser and a damp cloth (but leave brake discs and tires alone).
Step 5: Apply a protective layer
Now your motorcycle is spotless. Finished? Technically yes, but it’s a shame not to protect all that hard work. For the paint, you can use a ceramic spray or special polish. For other parts prone to corrosion, a silicone spray works wonders because it creates a water-repellent protective layer.
Classic bikes, tourers, and cruisers often feature chrome details, bring them back to life with a chrome polish. The same goes for aluminum parts like exhaust headers. How to get those stained, dull headers gleaming again? That’s a story for another blog, involving sandpaper, polishing pads, and maybe even a polishing machine.
Final tip
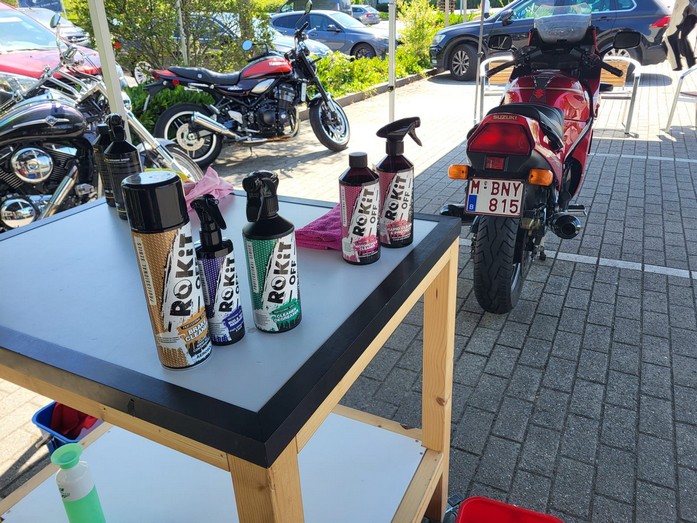
Good cleaning products make all the difference and can save you a lot of work. If your toolkit only goes as far as a sponge, bucket, and window cleaner, check out our motorcycle maintenance range and expand your cleaning arsenal.


